Tag Archives: linux

Blog latency

The Blog latency was quite high on the old hosting provider and was slow to respond most of the times. So when my subscription to the old hosting provider was coming to end, instead of renewing it, I decided to migrate the blog to my selfhosted kubernetes. Below is the comparison of blog latency before and after migration.

Before Migration
After Migration

Blog migrated to Kubernetes

My subscription on the old hosting provider was expiring and it has been few years since I updated my blog. So I decided to migrate the blog and get rid of outdated infra.
I moved the blog to my infrastructure where I am running most of my applications on kubernetes and I decided this is the time to move this blog along with few others on kubernetes.

I will later create a post on how I did the migration and how my current infrastructure is.

Installing and using docker containers on Fedora 24

Recently a lot of organizations started to migrate their environment to microservices architecture using containerization tools such as docker. The advantage with container tools are it is fast, robust and gives you ability to control its behavior. I am going to show you some basics with docker containers.  But first we need to have it installed on the system. I am using Fedora 24 as my workstation. So this guide is written keeping in mind F24, but it should work on any linux flavors as well.

Installing docker

Docker website has very good documentation about installing and using docker which can be found here. To save time I will list the steps below.

First get docker repo file or create one with below contents in it.

[dockerrepo]
name=Docker Repository
baseurl=https://yum.dockerproject.org/repo/main/fedora/$releasever/
enabled=1
gpgcheck=1
gpgkey=https://yum.dockerproject.org/gpg

Now you can use dnf to install the docker engine.

#dnf install docker-engine

Next you need to start the docker service and enable it to run at boot.

#systemctl start docker
#systemctl enable docker.service

This will allow you to run docker containers as root user, but if you want to allow normal users to run containers then you need to add them to docker group. Make sure the users have sudo privilages as well.

#usermod -aG docker username

Running nginx container

Now that we have installed docker and want to deploy nginx container. There are few ways to do it, but for simplicity we will use nginx from docker repo. To get the nginx container image run below command.

$docker pull nginx
Using default tag: latest
latest: Pulling from library/nginx

8ad8b3f87b37: Pull complete 
c6b290308f88: Pull complete 
f8f1e94eb9a9: Pull complete 
Digest: sha256:aa5ac743d65e434c06fff5ceaab6f35cc8519d80a5b6767ed3bdb330f47e4c31
Status: Downloaded newer image for nginx:latest

As we have not specified any tags it will default to latest and pull the latest nginx container image available from docker repository. You can verify the available images locally using below command.

$docker images
REPOSITORY TAG IMAGE ID CREATED SIZE
nginx latest 4a88d06e26f4 4 days ago 183.5 MB

Lets say we want to run the container in detached mode and want to forward port 8080 from our host to port 90 on nginx container run the below command.

$ docker run -itd --name web -p 8080:80 nginx:latest
8ab540475170566d15f4576b1f93b8193947c80cf60bf57d9448f858a15a8410

Docker operations with container

We can check running docker containers using below command.

$ docker ps
CONTAINER ID IMAGE COMMAND CREATED STATUS PORTS NAMES
8ab540475170 nginx:latest "nginx -g 'daemon off" 40 seconds ago Up 37 seconds 443/tcp, 0.0.0.0:8080->80/tcp web

As you can see the port 8080 is forwarded to container port 80.

Let’s check nginx on local port to see if it works

$ curl localhost:8080
<!DOCTYPE html>
<html>
<head>
<title>Welcome to nginx!</title>
<style>
 body {
 width: 35em;
 margin: 0 auto;
 font-family: Tahoma, Verdana, Arial, sans-serif;
 }
</style>
</head>
<body>
<h1>Welcome to nginx!</h1>
<p>If you see this page, the nginx web server is successfully installed and
working. Further configuration is required.</p>

<p>For online documentation and support please refer to
<a href="http://nginx.org/">nginx.org</a>.<br/>
Commercial support is available at
<a href="http://nginx.com/">nginx.com</a>.</p>

<p><em>Thank you for using nginx.</em></p>
</body>
</html>

If we want to stop the container just run below command.

$ docker stop web
web

And if you check no container should be running on the system now.

$docker ps
CONTAINER ID IMAGE COMMAND CREATED STATUS PORTS NAMES
$

There are lots of things that could be done with docker containers but we would revisit it next time.

Fun with Hadoop-Part 1

I deployed openstack private cloud previously at my home.

I have completed the series on my company’s official blog at http://pythian.com/blog/author/bhagat/

I was playing with bigdata and hadoop for some time now and decided to make use of my cloud infra. So I deployed 7 node hadoop cluster and did some fun stuff with it.

The first problem I faced however was computing power.

I had only one compute node and I was short on computing power to run the cluster. To overcome this I added 2 additional compute nodes in the cloud infra. But that is for another series.

I want to talk about hadoop so lets get started with it.

I decided to make use of Hortonworks hadoop with ambari server as the documentation and resources available to me were mostly for Hortonworks hadoop.

I first played with it on aws free tier but quickly realized that it might be costlier option for me to just play and learn hadoop.

So that made me decide to deploy my own hadoop cluster at my own place.

I am writing the contents of the follow up post, stay tuned for it.

On request from my company I have completed the series on Pythian official blog.

You can find it here once it is published.

Why I deployed private cloud at my home and How?

For long I have been thinking to deploy private cloud at my home.
This was due to fact that as part of my day to day job I comes across some “interesting”
issues to troubleshoot and fix.
Due to the fact that we can not do modifications and changes on trial and error bases on production boxes,
We always require to check things out in sandbox before proceeding on production.
Also having sandbox helps sharpen your skills and practising the technology/skills you want to develop.
I am already having pxe tftp, kvm and NAS storage at my place.
Which I have been using to generate different kind of scenarios in virtual environment.

Since long I wanted to convert the KVM only virtualization to private cloud for two reasons.
It will give me my own private cloud and deploying a scenario even in a vm takes time like installing os and cloing the parameters.
While in cloud once you launch the instnce you don’t have to worry about installing os as it gives you that on the fly ready to roll.

I will do doing follow up posts on how my home network is setup and how I achieved private cloud computing at home.

PXE Boot server on Fedora 15

Recently I planned to upgrade my laptop from Fedora 13 to Fedora 16.

Earlier I used to burn DVDs of the downloaded iso images of Fedoras.

This time I decided to setup PXE boot server on my desktop which is running Fedora 15.

I found a good post of setting up PXE boot server here.

I used it as reference and created the PXE server as described. But somehow it didn’t work for me as expected.

So I did some modification on the steps described in the post as it was written for FC4.

I am listing it down to save the time.

As I was doing it in my home network only, I did not isolate the network, as it was already isolated and only my desktop and laptop was connected to the network via ADSL router (The router was also serving as dhcp server, but I disabled it as I was configuring PXE boot server on my desktop which has dhcp server configuration)

Then I installed the required packages which are tftp-server, dhcp, syslinux and http via yum.

yum install tftp-server dhcp syslinux http -y

Then on second step I configured my dhcp server as below.

In the reference the dhcp path was /etc/dhcpd.conf which was for FC4 and for Fedora 15 its changed to /etc/dhcp/dhcpd.conf

The contents of the dhcpd.conf file is below

ddns-update-style interim;
subnet 192.168.1.0 netmask 255.255.255.0 {
range 192.168.1.10 192.168.1.254;
default-lease-time 3600;
max-lease-time 4800;
option routers 192.168.1.1;
option domain-name-servers 192.168.1.1;
option subnet-mask 255.255.255.0;
option domain-name "home.local";
option time-offset -8;
}
host lap0 {
hardware ethernet 04:4B:EE:80:FF:03;
fixed-address 192.168.1.254;
option host-name "lap0";
option next-server 192.168.1.2;
filename "pxelinux.0";
}

What I did is to setup a DNS and DHCP server which will assign the IP address 192.168.1.254 to the laptop with MAC address 04:4B:EE:80:FF:03.

Now for third step I did as follows.

Here I configured tftp server which will serve the PXE kernel to the PXE-boot capable laptop NIC for network booting.

The steps are as follows

Open and edit the /etc/xinetd.d/tftp file and make the changes as follows.

Change the line with disable=yes to disable=no

Change the line with srv_args = -s /var/lib/tftpboot to srv_args = -s /tftpboot

Here we enabled the tftp service and changed the root directory of tftp from /var/lib/tftpboot to /tftpboot

For some reason this didn’t work for me first time, so I uninstalled tftp-server and re installed again and that fixed the issue.

We are almost ready to finish. Now we only need to copy the necessary files and setup the apache and tftp-server to complete it.

Step four is as follows.

Create the directory /tftpboot/pxelinux.cfg

Now go the pxelinux.cfg directory and create a file default.

This is our default boot option file and put the contents as follows

prompt 1
default Fedora 16 x64 Install
timeout 100
label Fedora 16 x64 Install
kernel vmlinuz
append initrd=initrd.img ramdisk_size=9216 noapic acpi=off install=http://192.168.1.2/linux

Copy the file pxelinux.0 from /usr/share/syslinux to /tftpboot

Now we need the vmlinuz and initrd images for booting. For that we need to mount the iso image and copy the vmlinuz and initrd.img files from the isolinux directory on DVD.

After that I created a fedora install directory under /tftpboot/fedora-install.

Now we need to make it available via http so I did as follows.

Created a file /etc/httpd/conf.d/fedora_install.conf

And added the contents as follows.

Alias /linux /tftpboot/fedora-install
 <Directory /tftpboot/fedora-install>
 Options Indexes
 AllowOverride None
 </Directory>

Now restart the apache and xinetd for tftp PXE boot to take effect.

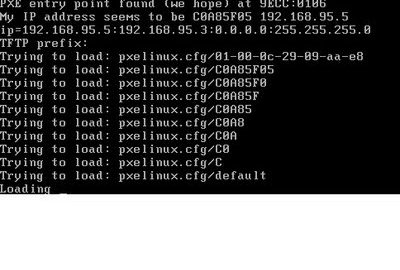
That is it. Now all I did is plug in my Laptop in the network and turn it on to boot via Network and voila.

Installation screen of Fedora 16 presented itself to complete it.

You can also use NFS and FTP install method the similar way.

That’s it for now. Please post your comments.