Every regulatory audit cycle eventually surfaces the same problem: someone needs evidence. Not intentions, not architecture diagrams, not screenshots from a dashboard that was open for five minutes – actual, machine-readable, tamper-evident evidence that specific security controls were active and effective across a defined set of systems during a defined period. For EU critical infrastructure operators subject to NIS2 and KRITIS, that period is typically the twelve months preceding a BSI audit or an ISO 27001 surveillance review.
The challenge compounds in multi-account AWS environments. You might have twenty to a hundred accounts spread across production, staging, development, and shared services workloads. Each account has its own resource inventory. Controls can be enabled in one and quietly absent in another. An engineer in a feature account disables Config recording to reduce noise during a sprint and forgets to re-enable it. A developer creates a security group with port 22 open to 0.0.0.0/0 because “it’s just dev.” None of this is tracked, none of it surfaces in the management account, and none of it is retrievable six months later when the auditor asks for a compliance timeline.
AWS Config with a delegated admin model solves this. It is not a replacement for detective controls like GuardDuty or a SIEM, and it does not give you runtime behavioral visibility. What it does give you – done correctly – is a centralised, queryable, cryptographically-chained record of the configuration state of every supported AWS resource in every account in your organization, continuously, over time. That is exactly what NIS2 Article 21(2)(f), KRITIS §8a, and ISO 27001 §9.1 are asking for when they require you to demonstrate the effectiveness of your security controls.
This post covers the end-to-end setup: the delegated admin architecture, conformance packs mapped to NIS2 and KRITIS requirements, and the automation pipeline that produces monthly audit packages your compliance officer can hand to a BSI auditor without further processing.
Why Delegated Admin Matters
Before the delegated admin model existed, you had two bad options for multi-account Config: either deploy everything independently in each account (no aggregation, no central governance) or do everything from the management account (which violates the principle of not running workloads or security tooling in the payer account). AWS Organizations’ delegated administrator feature gives you a third option: designate a Security account to act as the Config administrator for the entire organization.
The Security account gets the ability to:
- Create and manage a multi-account, multi-region configuration aggregator that pulls data from all member accounts
- Deploy organization-level conformance packs – YAML-defined sets of Config rules that get pushed to every member account automatically, including new accounts added later
- Access compliance results across all accounts without needing cross-account IAM roles in each member
- Register a centralized S3 delivery bucket as the target for Config snapshots and history from all accounts
Two service principals need delegation: config.amazonaws.com for the recorder and rule functions, and config-multiaccountsetup.amazonaws.com for the organization conformance pack deployment. Both must be registered, or org-level conformance pack deployment will fail silently on new accounts.
Architecture
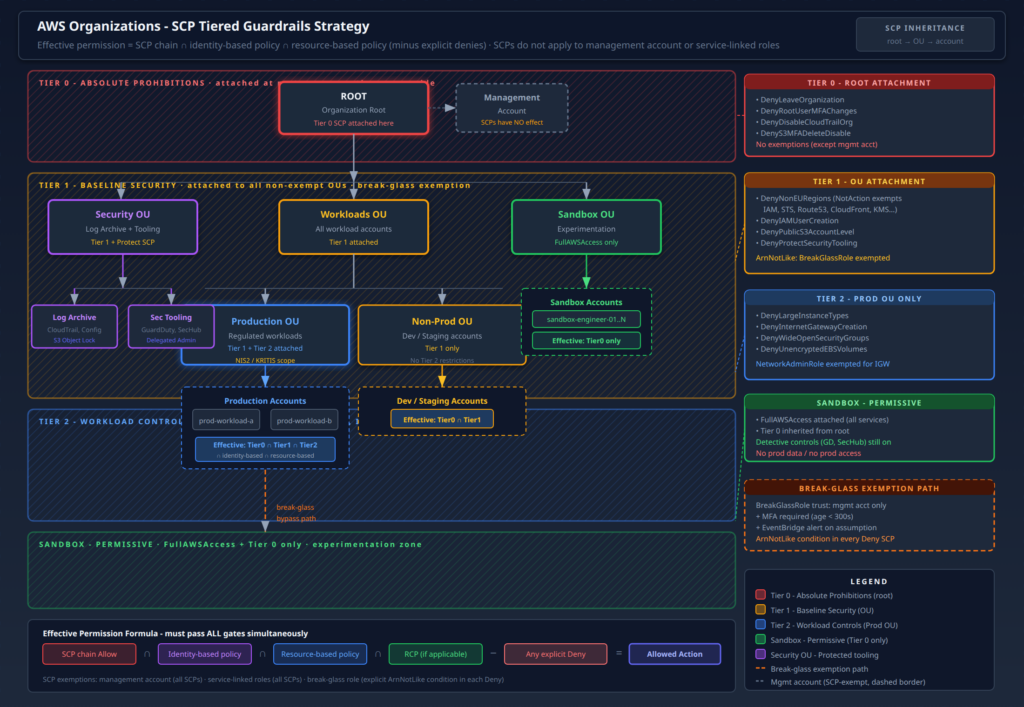
The diagram below shows the full multi-account topology. The key insight is the layering: the management account only holds organizational control plane resources (SCPs, the delegated admin registration, trusted access enablement). All operational Config infrastructure – the aggregator, the delivery bucket, the monitoring and alerting stack, the query layer – lives in the Security account. Member accounts run Config recorders and delivery channels that point cross-account at the centralized S3 bucket.
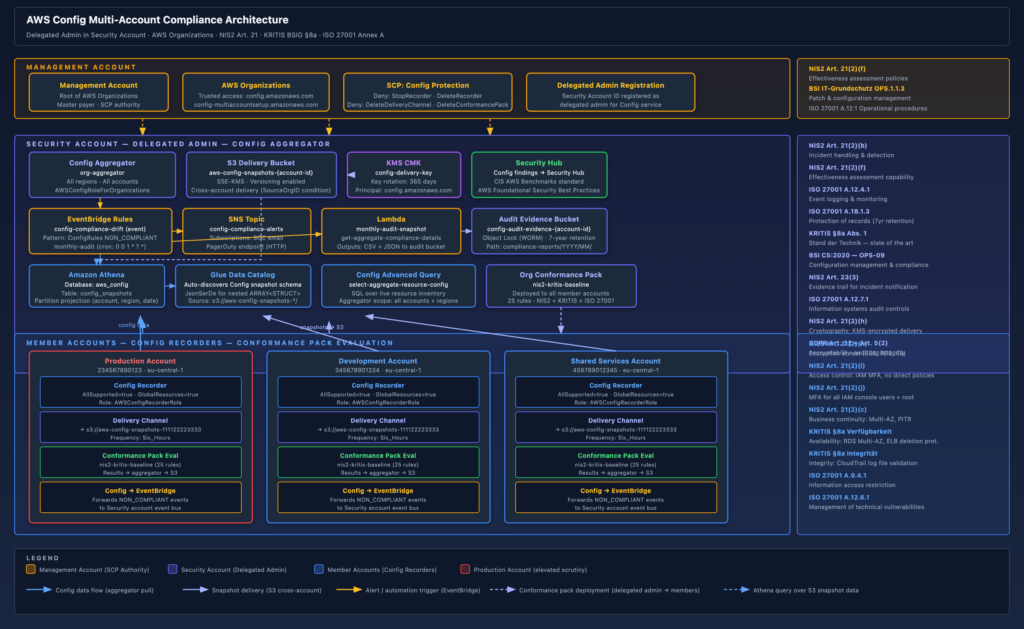
Three things in this architecture deserve particular attention because they are easy to get wrong:
The S3 bucket policy condition. The cross-account Config delivery requires a bucket policy that allows config.amazonaws.com to s3:PutObject from any account in your organization. The correct way to scope this is with aws:SourceOrgID, not a list of account IDs. This means new accounts automatically get delivery rights as soon as you onboard them without touching the bucket policy. The s3:x-amz-acl: bucket-owner-full-control condition is also required — without it, Config will deliver objects owned by the source account, and your Security account will not be able to read them.
The aggregator IAM role. The Config aggregator in the Security account needs AWSConfigRoleForOrganizations attached to a role that Config can assume. This role must exist in the Security account, and Config must have been granted trusted access to Organizations before the aggregator will function. The role allows Config to call organizations:ListAccounts and organizations:DescribeOrganization – it does not grant access to member account resources; the aggregator pull happens via the Config service plane, not via cross-account API calls from the Security account.
The SCP. Nothing in the default setup prevents a member account administrator from stopping the Config recorder, deleting the delivery channel, or deleting the conformance pack. For KRITIS and NIS2 this is a significant control gap – if an attacker or rogue insider can disable Config recording before acting, you lose your evidence trail for exactly the period that matters. You need an SCP at the root OU level that denies these actions for all principals except your break-glass role.
Setting Up the Delegated Admin
Step 1: Enable Trusted Access (Management Account)
# Run from the management account
aws organizations enable-aws-service-access \
  --service-principal config.amazonaws.com

aws organizations enable-aws-service-access \
--service-principal config-multiaccountsetup.amazonaws.comStep 2: Register the Security Account as Delegated Admin
# Replace 111122223333 with your Security account ID
aws organizations register-delegated-administrator \
  --account-id 111122223333 \
  --service-principal config.amazonaws.com

aws organizations register-delegated-administrator \
  --account-id 111122223333 \
--service-principal config-multiaccountsetup.amazonaws.comVerify registration:
aws organizations list-delegated-administrators \
  --service-principal config.amazonaws.com \
--output tableStep 3: Terraform – Management Account Resources
# delegated_admin.tf - applied from management account
# Assumes aws_organizations_organization already exists

resource "aws_organizations_delegated_administrator" "config" {
  account_id        = var.security_account_id
  service_principal = "config.amazonaws.com"
}

resource "aws_organizations_delegated_administrator" "config_multiaccountsetup" {
  account_id        = var.security_account_id
  service_principal = "config-multiaccountsetup.amazonaws.com"
}Step 4: Terraform – Security Account Aggregator
# config_aggregator.tf - applied from Security account

data "aws_iam_policy_document" "config_aggregator_assume_role" {
  statement {
    actions = ["sts:AssumeRole"]
    principals {
      type        = "Service"
      identifiers = ["config.amazonaws.com"]
    }
  }
}

resource "aws_iam_role" "config_org_aggregator" {
  name               = "AWSConfigRoleForOrganizations"
  assume_role_policy = data.aws_iam_policy_document.config_aggregator_assume_role.json
}

resource "aws_iam_role_policy_attachment" "config_org_aggregator" {
  role       = aws_iam_role.config_org_aggregator.name
  policy_arn = "arn:aws:iam::aws:policy/service-role/AWSConfigRoleForOrganizations"
}

resource "aws_config_configuration_aggregator" "org" {
  name = "org-aggregator"

  organization_aggregation_source {
    all_regions = true
    role_arn    = aws_iam_role.config_org_aggregator.arn
  }

  depends_on = [aws_iam_role_policy_attachment.config_org_aggregator]
}Step 5: Terraform – S3 Delivery Bucket
The delivery bucket lives in the Security account. The bucket policy uses aws:SourceOrgID to allow cross-account Config delivery from any member account without enumerating account IDs.
# config_delivery_bucket.tf - applied from Security account

data "aws_caller_identity" "security" {}
data "aws_organizations_organization" "main" {}

resource "aws_kms_key" "config_delivery" {
  description             = "KMS CMK for AWS Config delivery bucket"
  deletion_window_in_days = 7
  enable_key_rotation     = true

  policy = jsonencode({
    Version = "2012-10-17"
    Statement = [
      {
        Sid    = "EnableIAMPermissions"
        Effect = "Allow"
        Principal = {
          AWS = "arn:aws:iam::${data.aws_caller_identity.security.account_id}:root"
        }
        Action   = "kms:*"
        Resource = "*"
      },
      {
        Sid    = "AllowConfigServiceEncryption"
        Effect = "Allow"
        Principal = { Service = "config.amazonaws.com" }
        Action   = ["kms:Decrypt", "kms:GenerateDataKey"]
        Resource = "*"
      }
    ]
  })
}

resource "aws_s3_bucket" "config_delivery" {
  bucket        = "aws-config-snapshots-${data.aws_caller_identity.security.account_id}"
  force_destroy = false
}

resource "aws_s3_bucket_versioning" "config_delivery" {
  bucket = aws_s3_bucket.config_delivery.id
  versioning_configuration { status = "Enabled" }
}

resource "aws_s3_bucket_server_side_encryption_configuration" "config_delivery" {
  bucket = aws_s3_bucket.config_delivery.id
  rule {
    apply_server_side_encryption_by_default {
      sse_algorithm     = "aws:kms"
      kms_master_key_id = aws_kms_key.config_delivery.arn
    }
  }
}

resource "aws_s3_bucket_public_access_block" "config_delivery" {
  bucket                  = aws_s3_bucket.config_delivery.id
  block_public_acls       = true
  block_public_policy     = true
  ignore_public_acls      = true
  restrict_public_buckets = true
}

data "aws_iam_policy_document" "config_bucket_policy" {
  statement {
    sid    = "AWSConfigBucketPermissionsCheck"
    effect = "Allow"
    principals {
      type        = "Service"
      identifiers = ["config.amazonaws.com"]
    }
    actions   = ["s3:GetBucketAcl", "s3:ListBucket"]
    resources = [aws_s3_bucket.config_delivery.arn]
    condition {
      test     = "StringEquals"
      variable = "aws:SourceOrgID"
      values   = [data.aws_organizations_organization.main.id]
    }
  }

  statement {
    sid    = "AWSConfigBucketDelivery"
    effect = "Allow"
    principals {
      type        = "Service"
      identifiers = ["config.amazonaws.com"]
    }
    actions   = ["s3:PutObject"]
    resources = ["${aws_s3_bucket.config_delivery.arn}/config/AWSLogs/*/Config/*/*"]
    condition {
      test     = "StringEquals"
      variable = "s3:x-amz-acl"
      values   = ["bucket-owner-full-control"]
    }
    condition {
      test     = "StringEquals"
      variable = "aws:SourceOrgID"
      values   = [data.aws_organizations_organization.main.id]
    }
  }
}

resource "aws_s3_bucket_policy" "config_delivery" {
  bucket = aws_s3_bucket.config_delivery.id
  policy = data.aws_iam_policy_document.config_bucket_policy.json
}Step 6: Terraform – Member Account Config (Deployed via StackSets)
Deploy this to all member accounts via CloudFormation StackSets or a Terraform pipeline that iterates over the accounts list.
# config_member.tf - deployed to every member account via StackSet

variable "config_delivery_bucket" {
  description = "Cross-account S3 bucket in the Security account"
  type        = string
}

resource "aws_iam_role" "config_recorder" {
  name = "AWSConfigRecorderRole"
  assume_role_policy = jsonencode({
    Version = "2012-10-17"
    Statement = [{
      Effect    = "Allow"
      Action    = "sts:AssumeRole"
      Principal = { Service = "config.amazonaws.com" }
    }]
  })
}

resource "aws_iam_role_policy_attachment" "config_recorder" {
  role       = aws_iam_role.config_recorder.name
  policy_arn = "arn:aws:iam::aws:policy/service-role/AWSConfigRole"
}

resource "aws_config_configuration_recorder" "main" {
  name     = "default"
  role_arn = aws_iam_role.config_recorder.arn

  recording_group {
    all_supported                 = true
    include_global_resource_types = true
  }
}

resource "aws_config_delivery_channel" "main" {
  name           = "default"
  s3_bucket_name = var.config_delivery_bucket
  s3_key_prefix  = "config"

  snapshot_delivery_properties {
    delivery_frequency = "Six_Hours"
  }

  depends_on = [aws_config_configuration_recorder.main]
}

resource "aws_config_configuration_recorder_status" "main" {
  name       = aws_config_configuration_recorder.main.name
  is_enabled = true
  depends_on = [aws_config_delivery_channel.main]
}Step 7: SCP – Prevent Config Tampering
This SCP should be attached at the root OU level. It blocks any principal other than the designated break-glass role from disabling Config, deleting the delivery channel, or removing conformance packs. This is the control that ensures your evidence trail cannot be erased.
{
  "Version": "2012-10-17",
  "Statement": [
    {
      "Sid": "DenyConfigTampering",
      "Effect": "Deny",
      "Action": [
        "config:StopConfigurationRecorder",
        "config:DeleteConfigurationRecorder",
        "config:DeleteDeliveryChannel",
        "config:DeleteConfigRule",
        "config:DeleteOrganizationConfigRule",
        "config:DeleteConformancePack",
        "config:DeleteOrganizationConformancePack",
        "config:PutConfigurationRecorder"
      ],
      "Resource": "*",
      "Condition": {
        "StringNotLike": {
          "aws:PrincipalARN": [
            "arn:aws:iam::*:role/BreakGlassAdmin",
            "arn:aws:iam::*:role/TerraformConfigDeployRole"
          ]
        }
      }
    }
  ]
}Two caveats with this SCP. First, it does not protect the management account – SCPs do not apply to the management account itself. If you have Config in the management account (you should), its recorder is only protected by IAM. Second, TerraformConfigDeployRole (or whatever you name your IaC deployment role) needs to be exempted, or your Terraform pipeline that manages conformance pack updates will break.
Conformance Packs: Mapping NIS2, KRITIS, and ISO 27001 to Config Rules
Organization-level conformance packs are the mechanism for deploying a consistent set of Config rules across all accounts. You define the pack as a CloudFormation-like YAML template, upload it to S3, and deploy it from the Security account using put-organization-conformance-pack. The Config service handles delivery to all member accounts.
The mapping problem is real: NIS2 Article 21 and KRITIS §8a are written in legal language at a high level of abstraction. “Appropriate measures for network security” does not map to a single Config rule. Below is the mapping I use in practice. It is not exhaustive, and some regulatory articles have no direct AWS Config rule counterpart – those gaps have to be covered by other evidence (GuardDuty findings, CloudTrail log exports, manual assessments).
| Regulation / Article | Requirement | AWS Config Rule | Auto-Remediation Available |
|---|---|---|---|
| NIS2 Art. 21(2)(j) | Multi-factor authentication | MFA_ENABLED_FOR_IAM_CONSOLE_ACCESS | No (requires user action) |
| NIS2 Art. 21(2)(j) | MFA for root account | ROOT_ACCOUNT_MFA_ENABLED | No |
| NIS2 Art. 21(2)(h) | Encryption at rest – EBS | ENCRYPTED_VOLUMES | Yes (SSM: encrypt volume) |
| NIS2 Art. 21(2)(h) | Encryption at rest – RDS | RDS_STORAGE_ENCRYPTED | No (requires snapshot restore) |
| NIS2 Art. 21(2)(h) | Encryption at rest – S3 | S3_BUCKET_SERVER_SIDE_ENCRYPTION_ENABLED | Yes (SSM: enable SSE-S3/KMS) |
| NIS2 Art. 21(2)(h) | Encryption at rest – KMS key rotation | CMK_BACKING_KEY_ROTATION_ENABLED | Yes (enable key rotation) |
| NIS2 Art. 21(2)(a) + KRITIS §8a | Audit logging – CloudTrail enabled | CLOUD_TRAIL_ENABLED | Yes |
| NIS2 Art. 21(2)(a) + KRITIS §8a | Multi-region CloudTrail | MULTI_REGION_CLOUD_TRAIL_ENABLED | Yes |
| NIS2 Art. 21(2)(a) + KRITIS Integrität | CloudTrail log file validation | CLOUD_TRAIL_LOG_FILE_VALIDATION_ENABLED | Yes |
| NIS2 Art. 21(2)(a) | CloudTrail S3 bucket not public | CLOUD_TRAIL_BUCKET_LOGGING | No |
| NIS2 Art. 21(2)(a) | VPC flow logging | VPC_FLOW_LOGS_ENABLED | Yes |
| NIS2 Art. 21(2)(b) | Threat detection – GuardDuty | GUARDDUTY_ENABLED_CENTRALIZED | Yes (org-enable) |
| NIS2 Art. 21(2)(i) | IAM users: no inline/direct policies | IAM_USER_NO_POLICIES_CHECK | No |
| NIS2 Art. 21(2)(i) | Access key rotation | ACCESS_KEYS_ROTATED (maxAge=90) | No |
| NIS2 Art. 21(2)(i) | IAM password policy | IAM_PASSWORD_POLICY | Yes |
| NIS2 Art. 21(2)(i) | No root access keys | IAM_ROOT_ACCESS_KEY_CHECK | No |
| NIS2 Art. 21(2)(i) | Network – unrestricted SSH/RDP | RESTRICTED_INCOMING_TRAFFIC | Yes (revoke ingress rule) |
| NIS2 Art. 21(2)(c) + KRITIS Verfügbarkeit | RDS Multi-AZ | RDS_MULTI_AZ_SUPPORT | No |
| NIS2 Art. 21(2)(c) | DynamoDB PITR | DYNAMODB_PITR_ENABLED | Yes (enable PITR) |
| KRITIS §8a Verfügbarkeit | Backup plan exists | BACKUP_PLAN_MIN_FREQUENCY_AND_MIN_RETENTION_CHECK | No |
| KRITIS §8a Verfügbarkeit | ELB deletion protection | ELB_DELETION_PROTECTION_ENABLED | Yes |
| NIS2 Art. 21(2)(e) | Secrets Manager rotation | SECRETSMANAGER_ROTATION_ENABLED_CHECK | Yes |
| ISO 27001 A.12.4 | Security Hub enabled | SECURITYHUB_ENABLED | Yes (org-enable) |
| ISO 27001 A.9.2.3 | EC2 instances not using default VPC | EC2_INSTANCES_IN_VPC | No |
| ISO 27001 A.18.1.3 | S3 bucket server access logging | S3_BUCKET_LOGGING_ENABLED | Yes |
A few rules in this table require special configuration. ACCESS_KEYS_ROTATED takes an InputParameter for the maximum age – I use 90 days, which is defensible for NIS2 and BSI IT-Grundschutz ORP.4. BACKUP_PLAN_MIN_FREQUENCY_AND_MIN_RETENTION_CHECK takes frequency and retention parameters – 24 hours and 90 days is a reasonable minimum for KRITIS-regulated services. RESTRICTED_INCOMING_TRAFFIC checks for specific blocked ports; you want both 22 (SSH) and 3389 (RDP) blocked to 0.0.0.0/0 and ::/0.
Example Conformance Pack YAML
The following is an abbreviated but functional conformance pack template targeting NIS2 and KRITIS. Upload this to the Config delivery S3 bucket, then deploy it from the Security account.
# nis2-kritis-conformance-pack.yaml
# Deploy with: aws configservice put-organization-conformance-pack
# --organization-conformance-pack-name nis2-kritis-baseline
# --template-s3-uri s3://aws-config-snapshots-{account}/conformance-packs/nis2-kritis.yaml
# --delivery-s3-bucket aws-config-snapshots-{account}
# --delivery-s3-key-prefix conformance-pack-results

Parameters:
  AccessKeysRotatedParamMaxAccessKeyAge:
    Default: '90'
    Type: String
  BackupPlanRetentionDays:
    Default: '90'
    Type: String
  BackupPlanFrequencyValue:
    Default: '24'
    Type: String

Resources:

  # ---- NIS2 Art. 21(2)(j): Multi-factor authentication ----

  MFAEnabledForIAMConsoleAccess:
    Type: AWS::Config::ConfigRule
    Properties:
      ConfigRuleName: nis2-mfa-enabled-iam-console
      Description: "NIS2 Art. 21(2)(j): MFA must be enabled for all IAM users with console access"
      Source:
        Owner: AWS
        SourceIdentifier: MFA_ENABLED_FOR_IAM_CONSOLE_ACCESS

  RootAccountMFAEnabled:
    Type: AWS::Config::ConfigRule
    Properties:
      ConfigRuleName: nis2-root-mfa-enabled
      Description: "NIS2 Art. 21(2)(j): Root account MFA must be enabled"
      Source:
        Owner: AWS
        SourceIdentifier: ROOT_ACCOUNT_MFA_ENABLED

  # ---- NIS2 Art. 21(2)(h): Cryptography / Encryption ----

  EncryptedVolumes:
    Type: AWS::Config::ConfigRule
    Properties:
      ConfigRuleName: nis2-ebs-encrypted
      Description: "NIS2 Art. 21(2)(h): EBS volumes must be encrypted at rest"
      Source:
        Owner: AWS
        SourceIdentifier: ENCRYPTED_VOLUMES

  RDSStorageEncrypted:
    Type: AWS::Config::ConfigRule
    Properties:
      ConfigRuleName: nis2-rds-storage-encrypted
      Description: "NIS2 Art. 21(2)(h): RDS instances must have storage encryption enabled"
      Source:
        Owner: AWS
        SourceIdentifier: RDS_STORAGE_ENCRYPTED

  S3BucketServerSideEncryptionEnabled:
    Type: AWS::Config::ConfigRule
    Properties:
      ConfigRuleName: nis2-s3-sse-enabled
      Description: "NIS2 Art. 21(2)(h): S3 buckets must have default SSE enabled"
      Source:
        Owner: AWS
        SourceIdentifier: S3_BUCKET_SERVER_SIDE_ENCRYPTION_ENABLED

  CMKBackingKeyRotationEnabled:
    Type: AWS::Config::ConfigRule
    Properties:
      ConfigRuleName: nis2-cmk-key-rotation
      Description: "NIS2 Art. 21(2)(h): KMS CMKs must have automatic key rotation enabled"
      Source:
        Owner: AWS
        SourceIdentifier: CMK_BACKING_KEY_ROTATION_ENABLED

  # ---- NIS2 Art. 21(2)(a) + KRITIS: Logging ----

  CloudTrailEnabled:
    Type: AWS::Config::ConfigRule
    Properties:
      ConfigRuleName: nis2-cloudtrail-enabled
      Description: "NIS2 Art. 21(2)(a): CloudTrail must be enabled in this region"
      Source:
        Owner: AWS
        SourceIdentifier: CLOUD_TRAIL_ENABLED

  MultiRegionCloudTrailEnabled:
    Type: AWS::Config::ConfigRule
    Properties:
      ConfigRuleName: nis2-multiregion-cloudtrail
      Description: "NIS2 Art. 21(2)(a): A multi-region CloudTrail must exist and be enabled"
      Source:
        Owner: AWS
        SourceIdentifier: MULTI_REGION_CLOUD_TRAIL_ENABLED

  CloudTrailLogFileValidationEnabled:
    Type: AWS::Config::ConfigRule
    Properties:
      ConfigRuleName: nis2-kritis-cloudtrail-integrity
      Description: "NIS2 Art. 21(2)(a) + KRITIS §8a integrity: CloudTrail log file validation required"
      Source:
        Owner: AWS
        SourceIdentifier: CLOUD_TRAIL_LOG_FILE_VALIDATION_ENABLED

  VpcFlowLogsEnabled:
    Type: AWS::Config::ConfigRule
    Properties:
      ConfigRuleName: nis2-vpc-flow-logs
      Description: "NIS2 Art. 21(2)(a): VPC flow logs must be enabled for network visibility"
      Source:
        Owner: AWS
        SourceIdentifier: VPC_FLOW_LOGS_ENABLED

  # ---- NIS2 Art. 21(2)(b): Incident handling / detection ----

  GuardDutyEnabledCentralized:
    Type: AWS::Config::ConfigRule
    Properties:
      ConfigRuleName: nis2-guardduty-enabled
      Description: "NIS2 Art. 21(2)(b): GuardDuty must be enabled for threat detection"
      Source:
        Owner: AWS
        SourceIdentifier: GUARDDUTY_ENABLED_CENTRALIZED

  # ---- NIS2 Art. 21(2)(i): Access control ----

  AccessKeysRotated:
    Type: AWS::Config::ConfigRule
    Properties:
      ConfigRuleName: nis2-access-keys-rotated
      Description: "NIS2 Art. 21(2)(i): IAM access keys must be rotated within maxAccessKeyAge days"
      Source:
        Owner: AWS
        SourceIdentifier: ACCESS_KEYS_ROTATED
      InputParameters:
        maxAccessKeyAge: !Ref AccessKeysRotatedParamMaxAccessKeyAge

  IamUserNoPoliciesCheck:
    Type: AWS::Config::ConfigRule
    Properties:
      ConfigRuleName: nis2-iam-no-user-direct-policies
      Description: "NIS2 Art. 21(2)(i): IAM users must not have inline or attached policies (use groups/roles)"
      Source:
        Owner: AWS
        SourceIdentifier: IAM_USER_NO_POLICIES_CHECK

  RestrictedIncomingTraffic:
    Type: AWS::Config::ConfigRule
    Properties:
      ConfigRuleName: nis2-restrict-ssh-rdp
      Description: "NIS2 Art. 21(2)(i): Unrestricted inbound SSH (22) and RDP (3389) must be blocked"
      Source:
        Owner: AWS
        SourceIdentifier: RESTRICTED_INCOMING_TRAFFIC
      InputParameters:
        blockedPort1: '22'
        blockedPort2: '3389'

  IamRootAccessKeyCheck:
    Type: AWS::Config::ConfigRule
    Properties:
      ConfigRuleName: nis2-no-root-access-keys
      Description: "NIS2 Art. 21(2)(i): Root account must not have active access keys"
      Source:
        Owner: AWS
        SourceIdentifier: IAM_ROOT_ACCESS_KEY_CHECK

  # ---- NIS2 Art. 21(2)(c) + KRITIS Verfügbarkeit: Business continuity ----

  RdsMultiAzSupport:
    Type: AWS::Config::ConfigRule
    Properties:
      ConfigRuleName: nis2-kritis-rds-multi-az
      Description: "NIS2 Art. 21(2)(c) + KRITIS availability: RDS instances must be Multi-AZ"
      Source:
        Owner: AWS
        SourceIdentifier: RDS_MULTI_AZ_SUPPORT

  DynamoDbPitrEnabled:
    Type: AWS::Config::ConfigRule
    Properties:
      ConfigRuleName: nis2-dynamodb-pitr
      Description: "NIS2 Art. 21(2)(c): DynamoDB tables must have point-in-time recovery enabled"
      Source:
        Owner: AWS
        SourceIdentifier: DYNAMODB_PITR_ENABLED

  BackupPlanMinFrequencyAndMinRetentionCheck:
    Type: AWS::Config::ConfigRule
    Properties:
      ConfigRuleName: kritis-backup-plan-required
      Description: "KRITIS §8a Verfügbarkeit: AWS Backup plans must meet minimum frequency and retention"
      Source:
        Owner: AWS
        SourceIdentifier: BACKUP_PLAN_MIN_FREQUENCY_AND_MIN_RETENTION_CHECK
      InputParameters:
        requiredFrequencyUnit: hours
        requiredFrequencyValue: !Ref BackupPlanFrequencyValue
        requiredRetentionDays: !Ref BackupPlanRetentionDays

  # ---- NIS2 Art. 21(2)(e): Secure development ----

  SecretsManagerRotationEnabledCheck:
    Type: AWS::Config::ConfigRule
    Properties:
      ConfigRuleName: nis2-secrets-rotation-enabled
      Description: "NIS2 Art. 21(2)(e): Secrets Manager secrets must have automatic rotation enabled"
      Source:
        Owner: AWS
SourceIdentifier: SECRETSMANAGER_ROTATION_ENABLED_CHECKDeploy the org conformance pack from the Security account:
# Run from the Security account (delegated admin)
aws configservice put-organization-conformance-pack \
  --organization-conformance-pack-name nis2-kritis-baseline \
  --template-s3-uri s3://aws-config-snapshots-111122223333/conformance-packs/nis2-kritis.yaml \
  --delivery-s3-bucket aws-config-snapshots-111122223333 \
  --delivery-s3-key-prefix conformance-pack-results

# Monitor deployment status across all member accounts
aws configservice describe-organization-conformance-pack-statuses \
--organization-conformance-pack-names nis2-kritis-baselineOrg conformance pack deployment is asynchronous. The status API will show IN_PROGRESS for several minutes as Config rolls it out to each account. Failures appear per-account and usually indicate a missing Config recorder or a service-linked role problem in the target account.
One important note: organization conformance packs are limited to 50 rules per pack. If your control set exceeds this, deploy multiple packs (e.g., nis2-network-pack, nis2-iam-pack, kritis-availability-pack).
Generating Audit Artifacts
What Gets Delivered to S3 and Where
Config delivers two types of objects to the S3 bucket:
Configuration snapshots land at:
s3://aws-config-snapshots-{acct}/config/AWSLogs/{source-acct}/Config/{region}/YYYY/MM/DD/ConfigSnapshot/{uuid}.json.gzA snapshot is a full point-in-time dump of all configuration items for a given account and region. It is gzip-compressed JSON containing an array of configurationItems, each representing the complete resource configuration at capture time. The delivery frequency is controlled by the delivery channel – I recommend Six_Hours for production accounts.
Configuration history lands at:
s3://aws-config-snapshots-{acct}/config/AWSLogs/{source-acct}/Config/{region}/YYYY/MM/DD/ConfigHistory/{resourcetype}/{uuid}.json.gzHistory files contain the ordered sequence of configuration changes for a specific resource type over a period. This is the record an investigator uses to answer “what was the state of every RDS instance between March 1 and March 15?” during an incident investigation.
Config Advanced Query for Operational Compliance Queries
For day-to-day compliance checking against the live aggregated inventory, Config’s built-in advanced query feature is faster and simpler than Athena. It runs SQL against the current resource state in the aggregator and returns results in seconds.
# Find all S3 buckets without default encryption across all accounts
aws configservice select-aggregate-resource-config \
  --configuration-aggregator-name org-aggregator \
  --expression "SELECT accountId, awsRegion, resourceId, resourceName
                WHERE resourceType = 'AWS::S3::Bucket'
                AND NOT configuration.serverSideEncryptionConfiguration.rules[0] IS NOT NULL" \
  --max-results 100 \
  --output json

# Find EC2 volumes not encrypted
aws configservice select-aggregate-resource-config \
  --configuration-aggregator-name org-aggregator \
  --expression "SELECT accountId, awsRegion, resourceId, resourceName,
                       configuration.encrypted, configuration.state.name
                WHERE resourceType = 'AWS::EC2::Volume'
                AND configuration.encrypted = false" \
  --output json

# Count resources by type and account - useful for scope confirmation before audit
aws configservice select-aggregate-resource-config \
  --configuration-aggregator-name org-aggregator \
  --expression "SELECT accountId, resourceType, COUNT(*) AS count
                WHERE resourceType IN ('AWS::EC2::Instance',
                                        'AWS::RDS::DBInstance',
                                        'AWS::S3::Bucket',
                                        'AWS::Lambda::Function')
                GROUP BY accountId, resourceType
                ORDER BY count DESC" \
--output jsonAdvanced query uses a SQL dialect that is not standard SQL – it is closer to a structured filter language. Complex joins between resource types are not supported. Use Athena over S3 snapshots for those.
AWS CLI Export: Per-Rule Compliance Evidence
When an auditor asks for evidence that a specific control was effective, the most direct answer is the compliance details for that rule across all accounts. This command returns every resource evaluated by the rule and its compliance status – export it to JSON and you have a machine-readable artefact.
# Get all non-compliant resources for a specific rule across all accounts (via aggregator)
aws configservice describe-aggregate-compliance-by-config-rules \
  --configuration-aggregator-name org-aggregator \
  --filters ComplianceType=NON_COMPLIANT \
  --output json > non-compliant-rules-$(date +%Y%m%d).json

# Get resource-level details for a specific rule
aws configservice get-aggregate-compliance-details-by-config-rule \
  --configuration-aggregator-name org-aggregator \
  --config-rule-name nis2-ebs-encrypted \
  --account-id 234567890123 \
  --aws-region eu-central-1 \
  --compliance-type NON_COMPLIANT \
  --output json

# If you need per-account compliance details from within a member account
# (run against the local config service endpoint):
aws configservice get-compliance-details-by-config-rule \
  --config-rule-name nis2-ebs-encrypted \
  --compliance-types NON_COMPLIANT COMPLIANT \
  --output json | jq '.EvaluationResults[] | {
    resource: .EvaluationResultIdentifier.EvaluationResultQualifier.ResourceId,
    type: .EvaluationResultIdentifier.EvaluationResultQualifier.ResourceType,
    compliance: .ComplianceType,
    recorded: .ResultRecordedTime
}'Athena for Historical Evidence over S3 Snapshots
Config advanced query only sees current state. If an auditor asks “were all EBS volumes encrypted on January 31?”, you need the January 31 snapshot. That means Athena over the S3 snapshot history.
The table definition uses partition projection to avoid MSCK REPAIR TABLE runs and to make new partitions queryable immediately without crawling.
-- Create the Glue database
CREATE DATABASE IF NOT EXISTS aws_config;

-- External table over Config snapshots with partition projection
CREATE EXTERNAL TABLE IF NOT EXISTS aws_config.config_snapshots (
  fileversion         STRING,
  configsnapshotid    STRING,
  configurationitems  ARRAY<
    STRUCT<
      configurationitemversion:     STRING,
      configurationitemcapturetime: STRING,
      configurationstatemd5hash:    STRING,
      accountid:                    STRING,
      awsregion:                    STRING,
      availabilityzone:             STRING,
      resourcetype:                 STRING,
      resourceid:                   STRING,
      resourcename:                 STRING,
      arn:                          STRING,
      tags:                         MAP<STRING, STRING>,
      configurationitemstatus:      STRING,
      resourcecreationtime:         STRING,
      configuration:                STRING,
      supplementaryconfiguration:   MAP<STRING, STRING>
    >
  >
)
PARTITIONED BY (account_id STRING, region STRING, dt STRING)
ROW FORMAT SERDE 'org.openx.data.jsonserde.JsonSerDe'
WITH SERDEPROPERTIES (
  'serialization.format' = '1',
  'case.insensitive'     = 'TRUE'
)
LOCATION 's3://aws-config-snapshots-111122223333/config/AWSLogs/'
TBLPROPERTIES (
  'has_encrypted_data'       = 'true',
  'projection.enabled'       = 'true',
  'projection.account_id.type'   = 'enum',
  'projection.account_id.values' = '234567890123,345678901234,456789012345',
  'projection.region.type'       = 'enum',
  'projection.region.values'     = 'eu-central-1,eu-west-1',
  'projection.dt.type'           = 'date',
  'projection.dt.range'          = '2024/01/01,NOW',
  'projection.dt.format'         = 'yyyy/MM/dd',
  'projection.dt.interval'       = '1',
  'projection.dt.interval.unit'  = 'DAYS',
  'storage.location.template'    = 's3://aws-config-snapshots-111122223333/config/AWSLogs/${account_id}/Config/${region}/${dt}/ConfigSnapshot/'
);Once the table is created, you can query historical compliance state:
-- Query 1: All unencrypted EBS volumes on a specific date (NIS2 Art. 21(2)(h) evidence)
SELECT
  ci.accountid                                            AS account_id,
  ci.awsregion                                            AS region,
  ci.resourceid                                           AS volume_id,
  ci.resourcename                                         AS volume_name,
  json_extract_scalar(ci.configuration, '$.encrypted')    AS is_encrypted,
  json_extract_scalar(ci.configuration, '$.state.name')   AS state,
  ci.configurationitemcapturetime                         AS captured_at
FROM aws_config.config_snapshots
CROSS JOIN UNNEST(configurationitems) AS t(ci)
WHERE ci.resourcetype   = 'AWS::EC2::Volume'
  AND dt                = '2026/01/31'          -- specific audit date
  AND json_extract_scalar(ci.configuration, '$.encrypted') = 'false'
ORDER BY account_id, region;

-- Query 2: RDS instances without Multi-AZ on a specific date (KRITIS availability evidence)
SELECT
  ci.accountid                                                   AS account_id,
  ci.awsregion                                                   AS region,
  ci.resourceid                                                  AS db_instance_id,
  json_extract_scalar(ci.configuration, '$.dBInstanceClass')     AS instance_class,
  json_extract_scalar(ci.configuration, '$.engine')              AS engine,
  json_extract_scalar(ci.configuration, '$.multiAZ')             AS multi_az,
  json_extract_scalar(ci.configuration, '$.dBInstanceStatus')    AS db_status,
  ci.configurationitemcapturetime                                AS captured_at
FROM aws_config.config_snapshots
CROSS JOIN UNNEST(configurationitems) AS t(ci)
WHERE ci.resourcetype = 'AWS::RDS::DBInstance'
  AND dt = '2026/01/31'
  AND json_extract_scalar(ci.configuration, '$.multiAZ') = 'false'
ORDER BY account_id, region;

-- Query 3: Security groups with SSH or RDP open to the internet (NIS2 Art. 21(2)(i))
-- Note: this detects groups where a specific port range covers 22 or 3389
-- and the source CIDR is 0.0.0.0/0 or ::/0
SELECT
  ci.accountid    AS account_id,
  ci.awsregion    AS region,
  ci.resourceid   AS sg_id,
  ci.resourcename AS sg_name,
  json_extract_scalar(ci.configuration, '$.groupName')    AS group_name,
  json_extract_scalar(ci.configuration, '$.description')  AS description,
  ci.configurationitemcapturetime                         AS captured_at
FROM aws_config.config_snapshots
CROSS JOIN UNNEST(configurationitems) AS t(ci)
WHERE ci.resourcetype = 'AWS::EC2::SecurityGroup'
  AND dt BETWEEN '2026/01/01' AND '2026/01/31'
  AND (
    json_extract_scalar(ci.configuration, '$.ipPermissions') LIKE '%"fromPort": 22%'
    OR json_extract_scalar(ci.configuration, '$.ipPermissions') LIKE '%"fromPort": 3389%'
  )
  AND json_extract_scalar(ci.configuration, '$.ipPermissions') LIKE '%"cidrIp": "0.0.0.0/0"%'
ORDER BY account_id, dt DESC;

-- Query 4: Compliance resource count by type and account for audit scope confirmation
SELECT
  ci.accountid       AS account_id,
  ci.resourcetype    AS resource_type,
  COUNT(*)           AS resource_count
FROM aws_config.config_snapshots
CROSS JOIN UNNEST(configurationitems) AS t(ci)
WHERE dt = '2026/01/31'
GROUP BY ci.accountid, ci.resourcetype
ORDER BY account_id, resource_count DESC;Query 3 uses a LIKE pattern match against the JSON string because the ipPermissions field contains a nested array that is complex to flatten correctly in Presto SQL. This works for the audit evidence use case but will produce false positives if a rule has a cidr range that happens to contain the string "fromPort": 22 elsewhere. For production use, parse the JSON properly using json_extract and UNNEST over the permissions array.
Lambda: Automated Monthly Evidence Packages
The most operationally valuable component of this setup is a Lambda function triggered on a monthly schedule that automatically produces the compliance evidence package and delivers it to the audit evidence bucket. This means that when auditor season arrives, twelve months of evidence packages are already waiting in S3.
# monthly_audit_snapshot.py
# Runtime: Python 3.12, Region: eu-central-1 (Security account)
# Trigger: EventBridge rule, cron(0 0 1 * ? *)
# Required IAM permissions:
#   config:DescribeAggregateComplianceByConfigRules
#   config:GetAggregateComplianceDetailsByConfigRule
#   s3:PutObject on arn:aws:s3:::config-audit-evidence-{account}/*

import boto3
import json
import csv
import io
from datetime import datetime, timezone

AGGREGATOR_NAME = 'org-aggregator'
AUDIT_BUCKET    = 'config-audit-evidence-111122223333'
CONFIG_REGION   = 'eu-central-1'


def lambda_handler(event, context):
    config = boto3.client('config', region_name=CONFIG_REGION)
    s3     = boto3.client('s3', region_name=CONFIG_REGION)

    report_ts    = datetime.now(timezone.utc).strftime('%Y-%m-%dT%H:%M:%SZ')
    report_month = datetime.now(timezone.utc).strftime('%Y/%m')

    non_compliant = []

    # Paginate through all non-compliant rules in the aggregator
    rules_paginator = config.get_paginator('describe_aggregate_compliance_by_config_rules')
    for rules_page in rules_paginator.paginate(
        ConfigurationAggregatorName=AGGREGATOR_NAME,
        Filters={'ComplianceType': 'NON_COMPLIANT'},
        PaginationConfig={'PageSize': 100},
    ):
        for rule in rules_page['AggregateComplianceByConfigRules']:
            rule_name  = rule['ConfigRuleName']
            account_id = rule['AccountId']
            aws_region = rule['AwsRegion']

            # Get resource-level detail for each non-compliant rule
            details_paginator = config.get_paginator(
                'get_aggregate_compliance_details_by_config_rule'
            )
            for detail_page in details_paginator.paginate(
                ConfigurationAggregatorName=AGGREGATOR_NAME,
                ConfigRuleName=rule_name,
                AccountId=account_id,
                AwsRegion=aws_region,
                ComplianceType='NON_COMPLIANT',
                PaginationConfig={'PageSize': 100},
            ):
                for result in detail_page['AggregateEvaluationResults']:
                    qualifier = (
                        result['EvaluationResultIdentifier']['EvaluationResultQualifier']
                    )
                    recorded = result.get('ResultRecordedTime')
                    non_compliant.append({
                        'rule_name':      rule_name,
                        'account_id':     qualifier.get('AccountId', account_id),
                        'region':         qualifier.get('AwsRegion', aws_region),
                        'resource_type':  qualifier.get('ResourceType', ''),
                        'resource_id':    qualifier.get('ResourceId', ''),
                        'compliance':     result['ComplianceType'],
                        'recorded_time':  recorded.isoformat() if recorded else '',
                        'annotation':     result.get('Annotation', ''),
                    })

    # Build CSV for auditor handoff
    output = io.StringIO()
    if non_compliant:
        writer = csv.DictWriter(output, fieldnames=non_compliant[0].keys())
        writer.writeheader()
        writer.writerows(non_compliant)
    csv_content = output.getvalue()

    metadata = {
        'report-timestamp':    report_ts,
        'aggregator':          AGGREGATOR_NAME,
        'total-non-compliant': str(len(non_compliant)),
    }

    # Deliver CSV to audit bucket (WORM Object Lock enforced at bucket level)
    s3.put_object(
        Bucket=AUDIT_BUCKET,
        Key=f'compliance-reports/{report_month}/non-compliant-resources.csv',
        Body=csv_content.encode('utf-8'),
        ContentType='text/csv',
        ServerSideEncryption='aws:kms',
        Metadata=metadata,
    )

    # Deliver structured JSON for programmatic consumption
    s3.put_object(
        Bucket=AUDIT_BUCKET,
        Key=f'compliance-reports/{report_month}/non-compliant-resources.json',
        Body=json.dumps({
            'reportTimestamp':   report_ts,
            'aggregator':        AGGREGATOR_NAME,
            'totalNonCompliant': len(non_compliant),
            'findings':          non_compliant,
        }, indent=2).encode('utf-8'),
        ContentType='application/json',
        ServerSideEncryption='aws:kms',
        Metadata=metadata,
    )

    print(
        f"[monthly-audit-snapshot] {len(non_compliant)} non-compliant findings, "
        f"delivered to s3://{AUDIT_BUCKET}/compliance-reports/{report_month}/"
    )
return {'statusCode': 200, 'findingsCount': len(non_compliant)}The audit evidence bucket should have Object Lock in compliance mode with a minimum retention of 7 years. This satisfies the BSI KRITIS documentation retention requirement and the NIS2UmsuCG’s implied evidentiary preservation obligation. s3:DeleteObject on the audit bucket should be denied by SCP for all principals including administrators – only the Object Lock TTL should allow deletion.
Security Hub Integration
Config rules and Security Hub are not the same thing, but they talk to each other. When you enable the AWS Foundational Security Best Practices standard or CIS AWS Foundations Benchmark in Security Hub, Security Hub uses Config rules as its evaluation mechanism. The findings appear in Security Hub’s finding format (ASFF – AWS Security Finding Format) and can be aggregated, exported to S3 via Kinesis Firehose, and queried in OpenSearch or Splunk.
From the evidence collection standpoint, the dual-record approach is valuable: Config gives you the resource configuration timeline, Security Hub gives you the security finding timeline. When an auditor asks “how long was this S3 bucket without encryption, and when was it remediated?”, you can answer precisely with Config history, and you can show the Security Hub finding that triggered the remediation workflow.
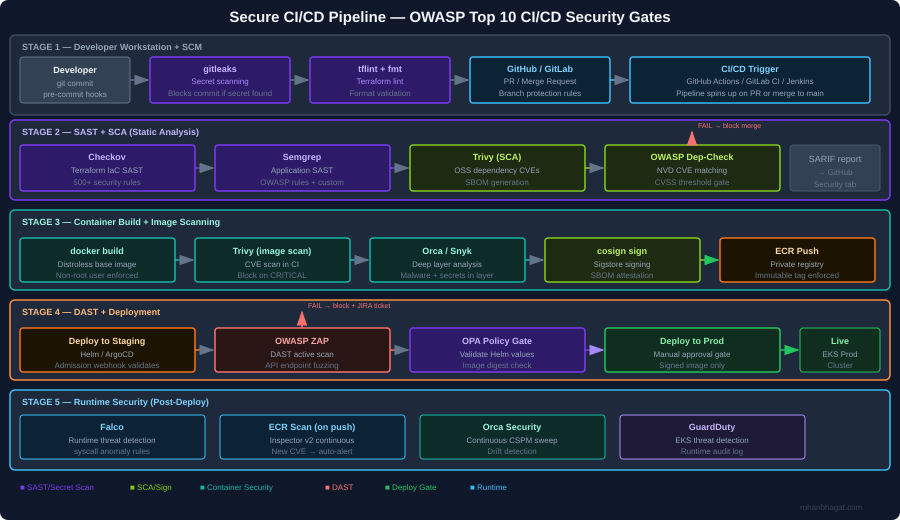
Evidence Flow
The following diagram shows the full pipeline from resource change to audit-ready artifact, including evidence types at each stage and the regulatory obligations they satisfy.
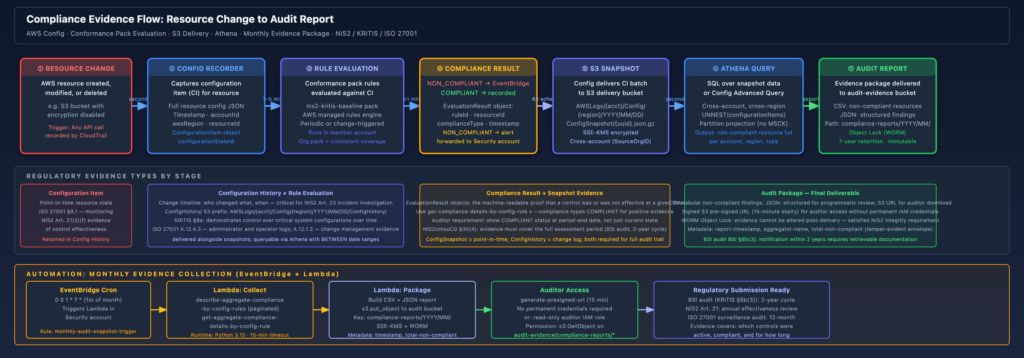
The key timing point that organizations consistently underestimate: Config snapshots are delivered on a schedule (every six hours by default), not in real time. If a resource is created and deleted within a single six-hour window, it may not appear in a snapshot at all. The configuration history files close this gap for most resources, but for very short-lived resources (spot instances, transient Lambda ENIs) there may be configuration items that exist only in the Config service’s internal record and are not in the delivered S3 artifacts. If your audit requires evidence of ephemeral resources, query the Config history API directly rather than relying solely on S3 snapshots.
Operational Runbook: What to Do When an Auditor Asks
Finding the Right S3 Path
Config’s S3 path structure is deterministic. For a BSI auditor asking for “evidence of CloudTrail configuration across all production accounts in Q1 2026”:
s3://aws-config-snapshots-{security-acct}/config/AWSLogs/{prod-acct}/Config/{region}/2026/01/
s3://aws-config-snapshots-{security-acct}/config/AWSLogs/{prod-acct}/Config/{region}/2026/02/
s3://aws-config-snapshots-{security-acct}/config/AWSLogs/{prod-acct}/Config/{region}/2026/03/Within each day’s directory, there will be:
ConfigSnapshot/– the full point-in-time snapshotsConfigHistory/– per-resource-type change logs
To list available snapshots for a specific account and date range:
aws s3 ls \
  s3://aws-config-snapshots-111122223333/config/AWSLogs/234567890123/Config/eu-central-1/2026/01/ \
  --recursive \
  --human-readable \
| grep ConfigSnapshotPulling a Compliance Dashboard Export
From the Security account, the aggregator API gives you an org-wide compliance summary in seconds:
# Compliance summary by rule across all accounts and regions
aws configservice describe-aggregate-compliance-by-config-rules \
  --configuration-aggregator-name org-aggregator \
  --output json \
  | jq '.AggregateComplianceByConfigRules[] | {
      rule: .ConfigRuleName,
      account: .AccountId,
      region: .AwsRegion,
      compliance: .Compliance.ComplianceType,
      compliant_count: (.Compliance.ComplianceContributorCount.CappedCount // 0),
      non_compliant_count: (.Compliance.ComplianceContributorCount.CappedCount // 0)
    }' \
> compliance-summary-$(date +%Y%m%d).jsonFor a conformance pack summary (aggregate compliance score across all rules in the pack):
aws configservice describe-aggregate-compliance-by-conformance-packs \
  --configuration-aggregator-name org-aggregator \
--output jsonGenerating a CSV for Auditor Handoff
# Pull the pre-generated monthly report (generated by Lambda)
aws s3 cp \
  s3://config-audit-evidence-111122223333/compliance-reports/2026/01/non-compliant-resources.csv \
  ./audit-evidence-2026-01.csv

# Or generate on demand for a specific rule across the org
aws configservice describe-aggregate-compliance-by-config-rules \
  --configuration-aggregator-name org-aggregator \
  --filters ComplianceType=NON_COMPLIANT \
  --output json \
  | jq -r '["ConfigRuleName","AccountId","AwsRegion","ComplianceType"],
            (.AggregateComplianceByConfigRules[] | [
              .ConfigRuleName, .AccountId, .AwsRegion, .Compliance.ComplianceType
            ]) | @csv' \
> non-compliant-$(date +%Y%m%d).csvGenerate a pre-signed URL for auditor access (avoids granting permanent IAM credentials to external parties):
aws s3 presign \
  s3://config-audit-evidence-111122223333/compliance-reports/2026/01/non-compliant-resources.csv \
  --expires-in 3600 \
--region eu-central-1Tagging Strategy for Resource Ownership Traceability
Config records tags as part of each configuration item. For audit traceability – specifically for attributing non-compliant resources to owning teams and service owners – a consistent tagging strategy is essential. Without it, the compliance report shows “EBS volume vol-0abc123def456 is not encrypted” but the auditor cannot determine which application team is responsible.
The minimum tag set I enforce via a Config rule (REQUIRED_TAGS) on all EC2, RDS, S3, and Lambda resources:
Owner        = team identifier (e.g., "payments-platform", "identity-services")
Environment  = production | staging | development
CostCenter   = internal billing code
DataClass = confidential | internal | publicDataClass is particularly useful in a KRITIS context because it helps scope which resources fall under KRITIS availability and integrity obligations versus general IT. Resources tagged DataClass=confidential with Environment=production get the most aggressive conformance pack rules; sandbox accounts get a relaxed pack.
Add the required tags rule to the conformance pack:
RequiredTagsForEC2:
    Type: AWS::Config::ConfigRule
    Properties:
      ConfigRuleName: required-tags-ec2
      Description: "ISO 27001 A.8.1.1 + KRITIS scope: EC2 instances must have required ownership tags"
      Source:
        Owner: AWS
        SourceIdentifier: REQUIRED_TAGS
      Scope:
        ComplianceResourceTypes:
          - "AWS::EC2::Instance"
          - "AWS::RDS::DBInstance"
          - "AWS::S3::Bucket"
          - "AWS::Lambda::Function"
      InputParameters:
        tag1Key: Owner
        tag2Key: Environment
tag3Key: DataClassWhat This Architecture Cannot Do
It is worth being direct about the gaps, because auditors who dig deep will find them.
Config does not cover OS-level and application-level configuration. If a NIS2 auditor asks whether TLS 1.0 is disabled on all application servers, Config’s EC2::Instance resource type records instance metadata but not the TLS configuration of the web server running on it. That requires AWS Systems Manager State Manager, OS-level scanning tools, or a custom Config rule backed by a Lambda function that calls the SSM Run Command API.
Config does not record network-layer behavior. The RESTRICTED_INCOMING_TRAFFIC rule checks security group rules, not actual traffic flows. A security group with port 22 open to 0.0.0.0/0 will flag as non-compliant, but if the same instance is in a private subnet behind a NAT gateway with no public IP, the actual exposure is different from what the rule suggests. For network behavior evidence, VPC flow logs and Network Firewall logs are the right sources.
Config change events have eventual-consistency semantics. There is a documented delay between a resource change occurring and the configuration item being recorded. For most resource types this is seconds to a few minutes, but for some resource relationships (IAM policy attachments, security group associations) it can be longer. If you need sub-minute audit trails, CloudTrail is the right source, not Config.
Config in the management account is not protected by SCPs. The SCP in Step 7 does not apply to the management account itself. If you run Config in the management account (to capture IAM and SCP changes that only exist at the organization level), those recorders are only protected by IAM policies. Consider adding a Service Control Policy enforcement check to your security monitoring – alert on any config:StopConfigurationRecorder call in the management account.
Conclusion
AWS Config with a delegated admin in the Security account is the right foundation for compliance evidence collection in multi-account AWS environments. The combination of organisation-level conformance packs, a centralized S3 delivery bucket, Config advanced queries for operational use, and Athena over S3 snapshots for historical queries gives you coverage across the full evidence lifecycle: real-time detection, point-in-time state, change history, and audit-package generation.
For organizations under NIS2, KRITIS, or ISO 27001, the practical payoff is significant. Instead of spending the first two weeks of an audit cycle gathering evidence manually from each account, you can hand an auditor a pre-signed S3 URL to twelve months of monthly compliance reports, answer specific questions with targeted Athena queries against the snapshot archive, and demonstrate continuous monitoring via the conformance pack compliance history. The evidence trail is machine-generated, tamper-resistant (WORM Object Lock), and traceable back to the specific resource in the specific account at the specific time – the three properties that make evidence credible in a regulatory context.
The weakest point in this architecture is typically not the technology; it is the process around what to do when a rule fires non-compliant. Without a remediation workflow that closes the finding within a defined SLA and records the resolution, the audit evidence shows a control was broken. Make sure the EventBridge alerting path from compliance drift to ticket creation to remediation verification is operationally tested before your first audit.
References
- NIS2 Directive (EU 2022/2555): EUR-Lex
- NIS2UmsuCG (German transposition, BGBl. 2025): Federal Law Gazette I, Nr. 54, 5 December 2025
- BSIG (BSI-Gesetz as amended): Gesetze im Internet – BSIG
- BSI KRITIS-Verordnung: Bundesministerium des Innern – BSI-KritisV
- BSI IT-Grundschutz Kompendium (OPS.1.1.3, ORP.4): BSI IT-Grundschutz
- BSI C5:2020 (Cloud Computing Compliance Criteria Catalogue): BSI C5
- ISO/IEC 27001:2022, Annex A controls
- AWS Config Developer Guide – Aggregator setup: docs.aws.amazon.com/config/aggregation
- AWS Config Developer Guide – Organization Conformance Packs: docs.aws.amazon.com/config/conformance-packs
- AWS Config Developer Guide – Advanced query: docs.aws.amazon.com/config/advanced-query
- AWS managed conformance pack templates: GitHub – aws-config-rules
- Terraform AWS provider –
aws_config_configuration_aggregator: registry.terraform.io/providers/hashicorp/aws - Terraform AWS provider –
aws_config_organization_conformance_pack: registry.terraform.io/providers/hashicorp/aws